


はじめに
前回は、
このPhotoCameraクラスには、
プレビューフレームを用いることで、
今回は、
CameraPreviewTest_
Barcode. zip
プレビューしながらリアルタイムエフェクト処理CameraPreviewTest_
ColorEffect. zip
プレビューしながらリアルタイムバーコード解析
ARGB32形式のプレビューフレームを取得してエフェクト処理を行う
冒頭の
Microsoft.
Windows Phone 7でもPCでも同じですが、

上位8ビットにはアルファ値が格納されています。このアルファ値は不透明度を表した値で、
下位24ビットにRGB値が格納されています。RGBとは三原色
プレビューフレームを取得するのは簡単です。例としてプレビューフレームをPhotoCamera.
// プレビューフレームを取得するバッファーを確保する
double pixelSize = camera.PreviewResolution.Width * camera.PreviewResolution.Height;
int[] pixelData = new int[(int)pixelSize];

// プレビューフレームを取得
camera.GetPreviewBufferArgb32(pixelData);

// 分離ストレージへARGBデータへ保存する
using (var store = IsolatedStorageFile.GetUserStoreForApplication())
using (var strm = store.CreateFile("preview.rgb")) {
    foreach (int pixel in pixelData) {
        var bytes = BitConverter.GetBytes(pixel);
        strm.Write(bytes, 0, bytes.Length);
    }
}
上記のコードを実行すると、
前回紹介しましたIsolated Strage Explorer Toolを使ってデータを取り出してもよいのですが、
これでは、
<Grid x:Name="ContentPanel" Grid.Row="1" Margin="12,0,12,0">
    <!-- この矩形にカメラプレビューを表示する -->
    <Rectangle x:Name="PreviewRectangle" Tap="PreviewRectangle_Tap">
        <Rectangle.Fill>
            <VideoBrush x:Name="PreviewBrush" />
        </Rectangle.Fill>
    </Rectangle>
        <!-- エフェクト処理後の画像を表示する -->
    <Image Height="310" x:Name="ImageEffect" Stretch="UniformToFill"
            VerticalAlignment="Bottom" RenderTransformOrigin="0.5,0.5"
            Margin="20,0,20,60" Width="401" />
</Grid>
Expression BlendでXAMLを表示すると下図のようになります。中央の枠がImageコントロールですので、
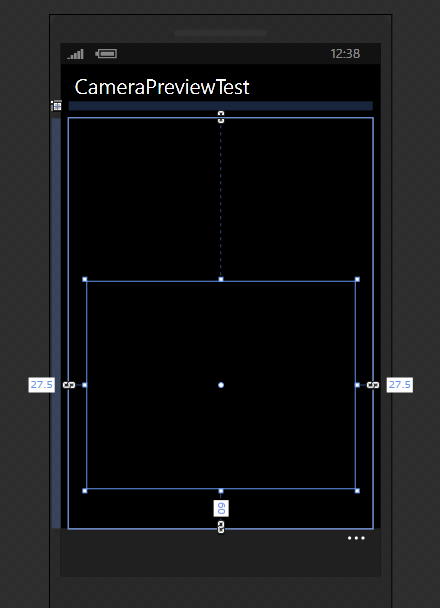
あとでエフェクト処理を掛けやすいように、
後ほどエフェクト処理を実装しますので、
    public class FrameBuffer {

        // 画像を格納するバッファ
        public int[] Buffer { get; set; }

        // バッファに格納する画像の幅
        public int Width { get; set; }

        // バッファに格納する画像の高さ
        public int Height { get; set; }

        public FrameBuffer(int width, int height) {
            Buffer = new int[width * height];
            Width = width;
            Height = height;
        }

        public void EffectSepiaTone() {
            // あとで紹介するメソッドです
        }
    }
ここで少し簡単にですが、
カメラのプレビュー表示の仕組みは、
大体のWindows Phone端末に搭載されているカメラの入力フレームレートは、
この速度でバーコードの解析は難しいので、
タイマーは、
// プレビューフレームの解析を行うタイマー
System.Windows.Threading.DispatcherTimer readTimer = null;

// カメラの初期化処理の完了
void  camera_Initialized(object sender, CameraOperationCompletedEventArgs e) {
    // 初期化処理に失敗した場合は何もしない
    if (!e.Succeeded)
        return;

    // カメラの回転角度に合わせてプレビュー表示も回転させる
    Dispatcher.BeginInvoke(() => {
        PreviewBrush.RelativeTransform = new CompositeTransform() {
            CenterX = 0.5, CenterY = 0.5,
            Rotation = camera.Orientation
        };

        ImageEffect.RenderTransform = new CompositeTransform() {
            CenterX = 0.5, CenterY = 0.5,
            Rotation = camera.Orientation
        };

        // 100ミリ秒毎に満了する様にタイマーを開始
        readTimer = new System.Windows.Threading.DispatcherTimer();
        readTimer.Tick += new EventHandler(readTimer_Tick);
        readTimer.Interval = TimeSpan.FromMilliseconds(100);
        readTimer.Start();
    });
}
100ミリ秒ごとにタイマーが満了し、
取り出したプレビューフレームをFrameBufferオブジェクトに取り込み、
// タイマー満了時にプレビューフレームにエフェクト処理
void readTimer_Tick(object sender, EventArgs e) {
var frame = new FrameBuffer(
(int)camera.PreviewResolution.Width,
(int)camera.PreviewResolution.Height);
camera.GetPreviewBufferArgb32(frame.Buffer);
// 取り込んだ画像をセピア調にする
frame.EffectSepiaTone();
// 取り込んだ画像をWriteableBitmapへセット
var wb = new WriteableBitmap(frame.Width, frame.Height);
frame.Buffer.CopyTo(wb.Pixels, 0);
ImageEffect.Source = wb;
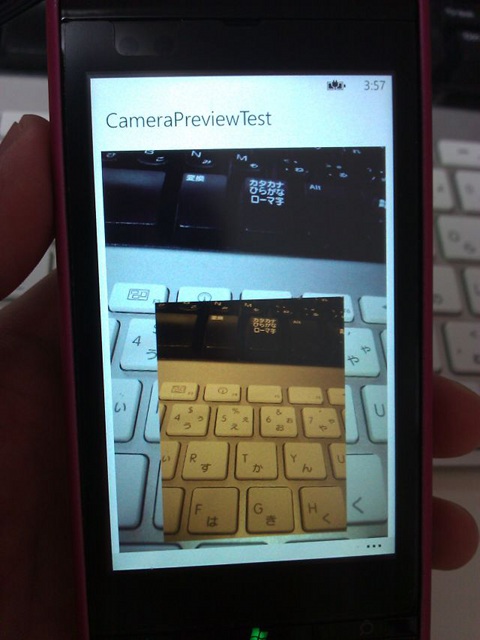
}以上のコードを実行すると、
EffectSepiaToneメソッドの実装については、
簡単に実装できるエフェクト処理のサンプルコードを記載していますので、
エフェクト処理の紹介:セピア調
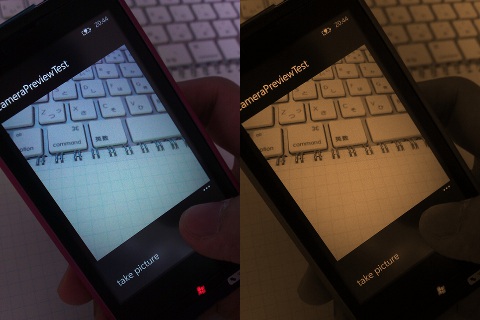
昔の写真のように少し色褪せた感じのセピア調になるエフェクト処理です。セピアというのはイカ墨の色のことで、
        /// <summary>
        /// 画像バッファをセピア調化する
        /// </summary>
        public void EffectSepiaTone() {
            for (int i = 0; i < Buffer.Length; i++) {
                int pixel = Buffer[i];

                // RGB値を取り出す
                byte r = Convert.ToByte((pixel >> 16) & 0xff);
                byte g = Convert.ToByte((pixel >> 8) & 0xff);
                byte b = Convert.ToByte(pixel & 0xff);

                // 平均値を求めてグレースケール化する
                byte avg = (byte)((r + g + b) / 3);

                // セピアに近づける為、計算を行う
                r = (byte)(avg * 1);
                g = (byte)(avg * 0.7);
                b = (byte)(avg * 0.4);

                Buffer[i] = 255 << 24 | r << 16 | g << 8 | b;
            }
        }
エフェクト処理の紹介:グレイスケール
グレイスケールは白と黒とその中間色で表現した言わば白黒写真です。白黒写真と言っても色空間やガンマ値を考慮した沢山の方法があります。R成分、
今回は一番簡単な単純平均法を使用しましょう。1ピクセルのR成分、
        /// <summary>
        /// 画像バッファをグレイスケール化する
        /// </summary>
        public void EffectGrayscale() {

            for (int i = 0; i < Buffer.Length; i++) {
                int pixel = Buffer[i];

                // RGB値を取り出す
                byte r = Convert.ToByte((pixel >> 16) & 0xff);
                byte g = Convert.ToByte((pixel >> 8) & 0xff);
                byte b = Convert.ToByte(pixel & 0xff);

                // 単純に平均値を取る
                byte avg = (byte)((r + g + b) / 3);

                Buffer[i] = 255 << 24 | avg << 16 | avg << 8 | avg;
            }
        }
エフェクト処理の紹介:カラーエフェクト
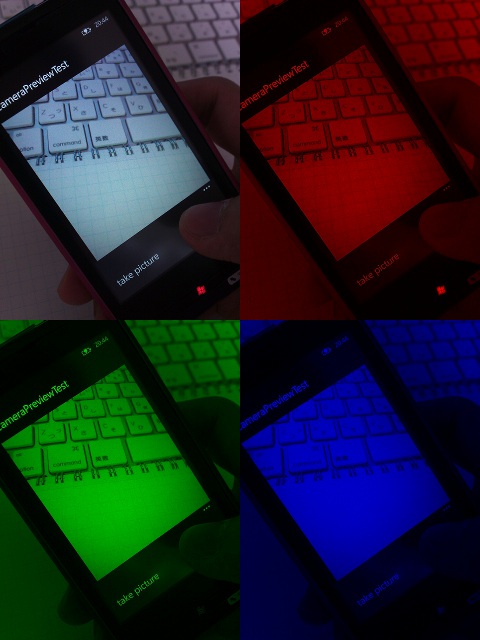
赤、
public enum ColorEffectType {
Red,
Green,
Blue
}
/// <summary>
/// 画像バッファにカラーエフェクトを掛ける
/// </summary>
public void EffectColor(ColorEffectType effectType) {
// 各RGB要素のいずれかの要素だけ有効にする
if (effectType == ColorEffectType.Red) {
for (int i = 0; i < Buffer.Length; i++)
Buffer[i] &= 0xff0000;
} else if (effectType == ColorEffectType.Green) {
for (int i = 0; i < Buffer.Length; i++)
Buffer[i] &= 0x00ff00;
} else if (effectType == ColorEffectType.Blue) {
for (int i = 0; i < Buffer.Length; i++)
Buffer[i] &= 0x0000ff;
}
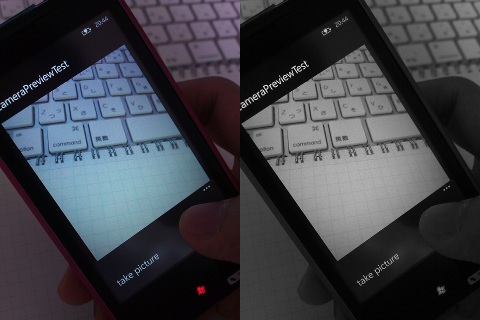
}エフェクト処理の紹介:ネガポジ反転
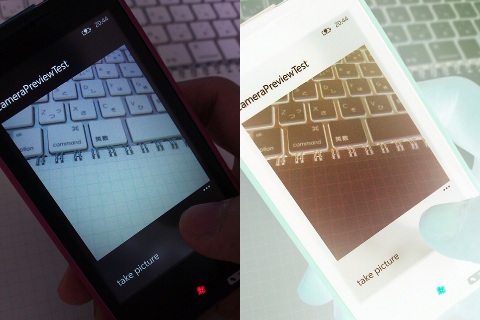
デジカメの時代となって久しいですが、
正しく見えるピクチャーフレームを加工するので、
        /// <summary>
        /// 画像バッファをネガポジ反転させる
        /// </summary>
        public void EffectNegative() {
            for (int i = 0; i < Buffer.Length; i++) {
                int pixel = Buffer[i];
                // 各RGB要素のビットを反転させる
                Buffer[i] = pixel ^ 0x00ffffff;
            }
        }
以上で、
YCbCr形式のプレビューフレームを取得してバーコード解析を行う
続いて、
PhotoCamera.
YCbCrフォーマットは、
バーコードの解析には色の情報は不要ですので、
public void GetPreviewBufferY(
    byte[] pixelData
)
今回バーコードの解析にライブラリを使用します。コードでの実装例の前に
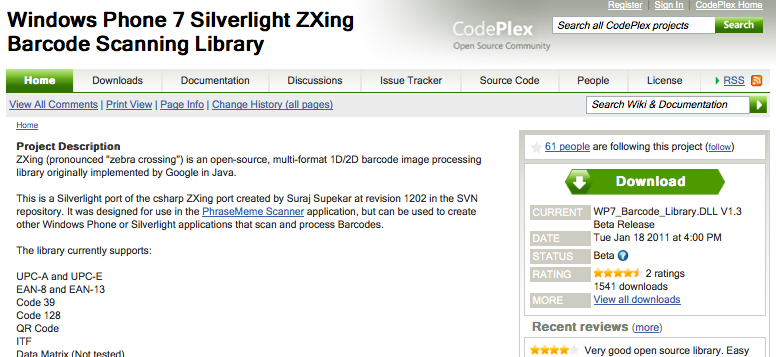
Windows Phone 7 Silverlight ZXing Barcode Scanning Libraryを使用する
Google社が公開しているオープンソースのうちのひとつに、
このZXingライブラリは、
2011年10月現在、
- UPC-A and UPC-E
- EAN-8 and EAN-13
- Code 39
- Code 128
- QR Code
- ITF
- Data Matrix (Not tested)
- PDF417 (Not tested)
バーコードを含んだ写真から解析を行うというライブラリの性格上、
導入
導入はとても簡単で、
既にビルド済みのdllアセンブリが含まれていますので、
- Silverlight_
ZXing_ Core. dll - WP7_
Barcode_ Library. dll

以上で、
次は画面を作っていきましょう。
前述した通り、
<Grid x:Name="ContentPanel" Grid.Row="1" Margin="12,0,12,0">
    <!-- この矩形にカメラプレビューを表示する -->
    <Rectangle x:Name="PreviewRectangle" Tap="PreviewRectangle_Tap">
        <Rectangle.Fill>
            <VideoBrush x:Name="PreviewBrush" />
        </Rectangle.Fill>
    </Rectangle>
    <!-- バーコード解析完了後に追加するリストボックス -->
    <ListBox Name="BarcodeListBox" FontSize="29.333" />
</Grid>
先ほどご紹介しましたリアルタイムにエフェクト処理を行うのと同様に、
au IS12TとHTC 7 Mozartの実機で動作確認を行いましたが、
// プレビューフレームの解析を行うタイマー
System.Windows.Threading.DispatcherTimer readTimer = null;

// カメラの初期化処理の完了
void  camera_Initialized(object sender, CameraOperationCompletedEventArgs e) {
    // 初期化処理に失敗した場合は何もしない
    if (!e.Succeeded)
        return;

    // カメラの回転角度に合わせてプレビュー表示も回転させる
    Dispatcher.BeginInvoke(() => {
        PreviewBrush.RelativeTransform = new CompositeTransform() {
            CenterX = 0.5, CenterY = 0.5,
            Rotation = camera.Orientation
        };

        // 100ミリ秒毎に満了する様にタイマーを開始
        readTimer = new System.Windows.Threading.DispatcherTimer();
        readTimer.Tick += new EventHandler(readTimer_Tick);
        readTimer.Interval = TimeSpan.FromMilliseconds(100);
        readTimer.Start();
    });
}
Zxingにはいくつかのバーコード解析クラスが存在しています。今回はそのうちのQRコード用のQRCodeReaderクラスを使用します。このQRCodeReaderクラスは解析対象にBinaryBitmapオブジェクトを作成する必要があります。
LuminanceSourceクラスを継承したPreviewFrameLuminanceSourceクラスを作成し、
public class PreviewFrameLuminanceSource : LuminanceSource {

// プレビューフレームを格納するバッファ
public byte[] Buffer { get; set; }

public PreviewFrameLuminanceSource(int width, int height) : base(width, height) {
    Buffer = new byte[width * height];
}

/// <summary>
/// バッファをsbyte[]型で取得する
/// </summary>
public override sbyte[] Matrix {
    get {
        // Bufferをbyte[]からsbyte[]へキャスト
        return ((Buffer as Array) as sbyte[]);
    }
}

/// <summary>
///  1ラインずつデータを取得
/// </summary>
public override sbyte[] getRow(int y, sbyte[] row) {
    // 前回確保したrowとサイズが異なる場合、再度確保しなおす
    if (row == null || row.Length < Width) {
        row = new sbyte[Width];
    }

    for (int i = 0; i < Height; i++) {
        row[i] = Convert.ToSByte(Buffer[i * Width + y]);
    }

    return row;
}
}
輝度情報のバッファを格納したPreviewFrameLuminanceSourceオブジェクトを元に、
QRCodeReader.
// タイマー満了時にプレビューフレームにバーコードが含まれているか解析
void readTimer_Tick(object sender, EventArgs e) {
// プレビューフレームの取得
var luminanceSource = new PreviewFrameLuminanceSource(
(int)camera.PreviewResolution.Width,
(int)camera.PreviewResolution.Height);
camera.GetPreviewBufferY(luminanceSource.Buffer);
// リーダーインスタンス生成
var reader = new QRCodeReader();
// バーコード解析用のBitmapを作成
var binarizer = new HybridBinarizer(luminanceSource);
var binBitmap = new BinaryBitmap(binarizer);
Result result = null;
try {
// バーコードの解析(デコード)を行う
result = reader.decode(binBitmap);
} catch (ReaderException) {
// プレビューフレーム内にバーコードが見つからなかった場合
// 読み取り例外のReaderExceptionが発行されてしまう
return;
} catch (Exception ex) {
throw ex;
}
// コントロールへのアクセスを行うのでUIスレッドにて非同期で実行
Dispatcher.BeginInvoke(() => {
// 既にテキストが含まれていれば追加しない
if (!BarcodeListBox.Items.Contains(result.Text)) {
BarcodeListBox.Items.Add(result.Text);
}
});
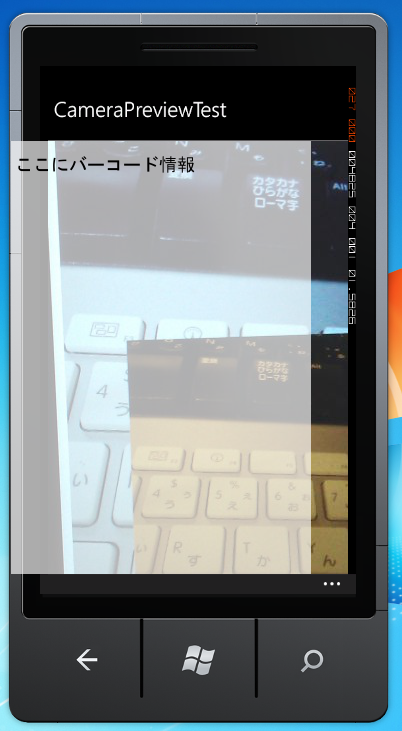
}写真の撮り方が悪かったのでかなり見えにくいですが、
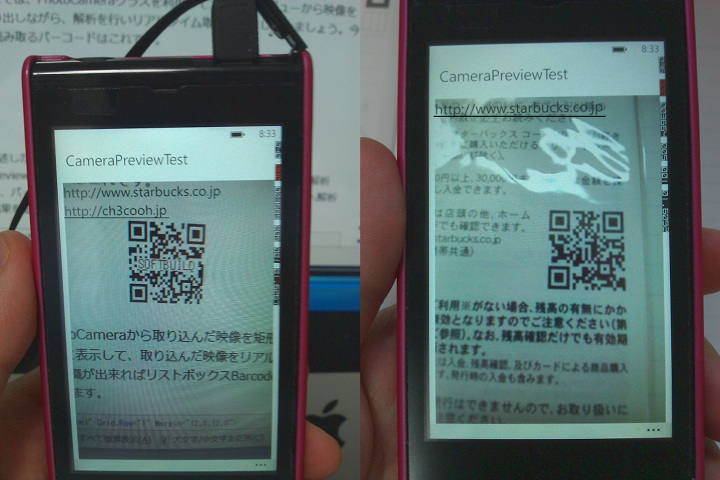
サンプルアプリケーションの実装としては以上です。ライブラリ組み込みも難易度もそれほど高くなく、
さいごに
今回はカメラを使ったリアルタイムなエフェクト処理とバーコード解析処理をご紹介させて頂きました。
上記で紹介したように延々と画像の入力を受け付けるアプリケーションのほかにも、
エフェクト処理は、
今回は以上で終わりです。ありがとうございました。