前回までの作業で、
データベース設計とテーブル定義
データベースのテーブルを作成するためには、
| 画面 | フィールド1 | フィールド2 |
|---|---|---|
| 新規エントリー入力画面 | タイトル | 内容 |
| 新規エントリー入力確認画面 | タイトル | 内容 |
| エントリー一覧画面 | タイトル | |
| エントリー参照画面 | タイトル | 内容 |
| エントリー編集画面 | タイトル | 内容 |
| エントリー削除確認画面 | タイトル | 内容 |
ごらんの通り、
CREATE TABLE entry (
  id serial,
  title varchar(255) NOT NULL,
  content text NOT NULL,
  PRIMARY KEY(id)
);
データベース及びユーザの作成
次に、
> connect to template1@localhost user postgres password;
# PostgreSQL 8.2.1 on i686-pc-mingw32, compiled by GCC gcc.exe (GCC) 3.4.4 (mingw special)
# CONNECT TO  template1@localhost:5432  AS  template1  USER  postgres
> create user pieceblog with password 'pieceblog';
CREATE ROLE
> ?u
[ List of user names ]
 Username         | SupperUser | CreateDB
------------------+------------+----------
 postgres         | yes        | yes
 pieceblog        | no         | no
(2 rows)

> create database pieceblog owner pieceblog encoding 'UTF8';
CREATE DATABASE
> ?l
[ List of databases ]
 Name             | Owner            | Encoding
------------------+------------------+----------
 pieceblog        | pieceblog        | UTF8
 postgres         | postgres         | EUC_JP
 template0        | postgres         | EUC_JP
 template1        | postgres         | EUC_JP
(4 rows)
作成が完了したら、
> connect to pieceblog@localhost user pieceblog pieceblog;
# PostgreSQL 8.2.1 on i686-pc-mingw32, compiled by GCC gcc.exe (GCC) 3.4.4 (mingw special)
# CONNECT TO  pieceblog@localhost:5432  AS  pieceblog  USER  pieceblog
> ?m
# Connected Databases List (C: current database is '*')
+---+--------------+-----------+---------------------------+-----------------+
| C | connect_name | user_name | target_name(db@host:port) | client_encoding |
+---+--------------+-----------+---------------------------+-----------------+
|   | template1    | postgres  | template1@localhost:5432  |                 |
| * | pieceblog    | pieceblog | pieceblog@localhost:5432  |                 |
+---+--------------+-----------+---------------------------+-----------------+
(2 rows)
テーブルの作成
続いて、
> CREATE TABLE entry (
>   id serial,
>   title varchar(255) NOT NULL,
>   content text NOT NULL,
>   PRIMARY KEY(id)
> );
NOTICE:  CREATE TABLE will create implicit sequence "entry_id_seq" for serial column "entry.id"
NOTICE:  CREATE TABLE / PRIMARY KEY will create implicit index "entry_pkey" for table "entry"
CREATE TABLE
> ?d entry
[ "entry" data definitions ]
 Attribute | Type                   | NotNull  | Default
-----------+------------------------+----------+-----------------------------------
 id        | integer                | not null | nextval('entry_id_seq'::regclass)
 title     | character varying(255) | not null |
 content   | text                   | not null |
(3 rows)

PrimaryKey: entry_pkey
以上でデータベース側の準備は完了です。
PieceORMコンポーネントとMDB2_Driver_pgsqlのインストール
PHPからデータベースにアクセスするには下記の方法が考えられます。
- PHPにバンドルされている各RDBMS用のエクステンションを直接使う
(抽象度: 低) - 古くはPEAR::DBに代表されるようなデータベース抽象化ライブラリを使う
(抽象度: 中) - オブジェクトリレーショナルマッピングフレームワークを使う
(抽象度: 高)
抽象度が高くなるにつれて、
Piece_
では、
> pear.bat install piece/piece_unity_component_pieceorm
...
> pear.bat list -a
INSTALLED PACKAGES, CHANNEL __URI:
==================================
(no packages installed)

INSTALLED PACKAGES, CHANNEL PEAR.PHP.NET:
=========================================
PACKAGE             VERSION STATE
Archive_Tar         1.3.2   stable
Cache_Lite          1.7.2   stable
Console_Getopt      1.2.3   stable
HTML_Template_Flexy 1.2.5   stable
MDB2                2.4.1   stable
Net_URL             1.0.15  stable
PEAR                1.6.2   stable
Structures_Graph    1.0.2   stable
INSTALLED PACKAGES, CHANNEL PEAR.PIECE-FRAMEWORK.COM:
=====================================================
PACKAGE                                          VERSION STATE
Piece_Examples_Basics                            1.0.0   stable
Piece_Flow                                       1.13.0  stable
Piece_ORM                                        0.8.0   beta
Piece_Right                                      1.7.0   stable
Piece_Unity                                      1.1.0   stable
Piece_Unity_Component_Authentication             0.13.0  beta
Piece_Unity_Component_Flexy                      1.1.0   stable
Piece_Unity_Component_NullByteAttackPreventation 1.0.0   stable
Piece_Unity_Component_PieceORM                   1.1.0   stable
Stagehand_FSM                                    1.9.0   stable
INSTALLED PACKAGES, CHANNEL PECL.PHP.NET:
=========================================
(no packages installed)
MDB2はそれ単体では抽象化されたAPIを定義しているにすぎませんので、
> pear.bat install mdb2_driver_pgsql
...
> pear.bat list -a
INSTALLED PACKAGES, CHANNEL __URI:
==================================
(no packages installed)
INSTALLED PACKAGES, CHANNEL PEAR.PHP.NET:
=========================================
PACKAGE             VERSION STATE
Archive_Tar         1.3.2   stable
Cache_Lite          1.7.2   stable
Console_Getopt      1.2.3   stable
HTML_Template_Flexy 1.2.5   stable
MDB2                2.4.1   stable
MDB2_Driver_pgsql   1.4.1   stable
Net_URL             1.0.15  stable
PEAR                1.6.2   stable
Structures_Graph    1.0.2   stable
INSTALLED PACKAGES, CHANNEL PEAR.PIECE-FRAMEWORK.COM:
=====================================================
PACKAGE                                          VERSION STATE
Piece_Examples_Basics                            1.0.0   stable
Piece_Flow                                       1.13.0  stable
Piece_ORM                                        0.8.0   beta
Piece_Right                                      1.7.0   stable
Piece_Unity                                      1.1.0   stable
Piece_Unity_Component_Authentication             0.13.0  beta
Piece_Unity_Component_Flexy                      1.1.0   stable
Piece_Unity_Component_NullByteAttackPreventation 1.0.0   stable
Piece_Unity_Component_PieceORM                   1.1.0   stable
Stagehand_FSM                                    1.9.0   stable
INSTALLED PACKAGES, CHANNEL PECL.PHP.NET:
=========================================
(no packages installed)
以上で必要なパッケージのインストールは完了です。
PieceORMコンポーネントの設定
PieceORMコンポーネントを利用するためには、
...
- name: ConfiguratorChain
  point:
    - name: configurators
      type: extension
      value:
        - Configurator_PieceORM

- name: Configurator_PieceORM
  point:
    - name: configDirectory
      type: configuration
      value: ../webapp/config/orm
    - name: cacheDirectory
      type: configuration
      value: ../webapp/cache/orm
    - name: mapperConfigDirectory
      type: configuration
      value: ../webapp/config/orm/mappers
ConfiguratorChainプラグインの拡張ポイントconfiguratorsは、
Configurator_
| 設定ポイント | 概要 |
|---|---|
| configDirectory | Piece_ |
| cacheDirectory | 各種キャッシュの配置先ディレクトリ |
| mapperConfigDirectory | マッパー定義ファイルの配置先ディレクトリ |
データアクセスコード配置先の検討とフローの変更-新規エントリー入力フロー
Piece_
さて、

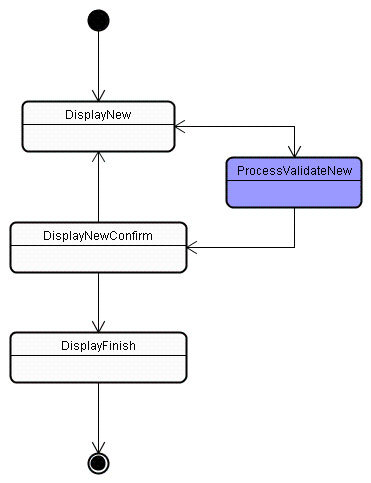
現在のフロー定義では、
...
  - name: DisplayNewConfirm
    view: NewConfirm
    activity:
      class: Entry_NewAction
      method: doActivityOnDisplayNewConfirm
    transition:
      - event: DisplayNewFinishFromDisplayNewConfirm
        nextState: DisplayNewFinish
      - event: DisplayNewFromDisplayNewConfirm
        nextState: DisplayNew
...
...
  - name: DisplayNewConfirm
    view: NewConfirm
    activity:
      class: Entry_NewAction
      method: doActivityOnDisplayNewConfirm
    transition:
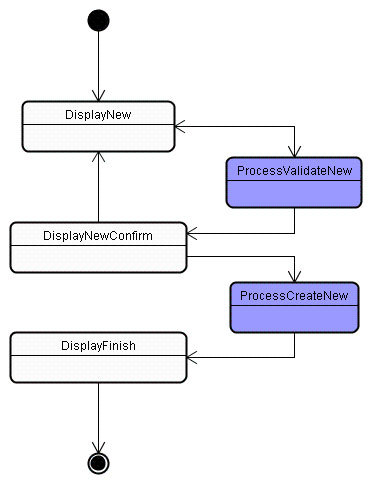
      - event: ProcessCreateNewFromDisplayNewConfirm
        nextState: ProcessCreateNew
      - event: DisplayNewFromDisplayNewConfirm
        nextState: DisplayNew

actionState:

  - name: ProcessValidateNew
    activity:
      class: Entry_NewAction
      method: doActivityOnProcessValidateNew
    transition:
      - event: DisplayNewConfirmFromProcessValidateNew
        nextState: DisplayNewConfirm
      - event: DisplayNewFromProcessValidateNew
        nextState: DisplayNew

  - name: ProcessCreateNew
    activity:
      class: Entry_NewAction
      method: doActivityOnProcessCreateNew
    transition:
      - event: DisplayNewFinishFromProcessCreateNew
        nextState: DisplayNewFinish
その他にも、
<h4 class="date-header">NewConfirm</h4>
<p>Title: {entry.title}</p>
<p>Content: {GLOBALS.displayTextArea(entry.content):h}</p>
<form name="NewConfirm" id="NewConfirm">
  <input type="hidden" name="{__flowExecutionTicketKey}" value="{__flowExecutionTicket}" />
  <p>
    <input type="submit" name="{__eventNameKey}_DisplayNewFromDisplayNewConfirm" value="Back" />
    <input type="submit" name="{__eventNameKey}_ProcessCreateNewFromDisplayNewConfirm" value="Create" />
  </p>
</form>...
function doActivityOnDisplayNewConfirm()
{
$flexyElement = &new Piece_Unity_Service_FlexyElement();
$flexyElement->addForm($this->_flow->getView(), $this->_context->getScriptName());
$viewElement = &$this->_context->getViewElement();
$viewElement->setElementByRef('entry', $this->_entry);
}
function doActivityOnProcessCreateNew()
{
return 'DisplayNewFinishFromDisplayNewConfirm';
}
}
?>変更が完了したら、
データアクセスコードの実装─新規エントリー入力フロー
では、
<?
require_once 'Piece/Unity/Service/FlowAction.php';
require_once 'Piece/Unity/Service/FlexyElement.php';
require_once 'Piece/ORM.php';

class Entry_NewAction extends Piece_Unity_Service_FlowAction
{
    var $_entry;

    function Entry_NewAction()
    {
        $this->_entry = &Piece_ORM::createObject('Entry');
    }
...
    function doActivityOnProcessCreateNew()
    {
        $mapper = &Piece_ORM::getMapper('Entry');
        $mapper->insert($this->_entry);

        return 'DisplayNewFinishFromDisplayNewConfirm';
    }
}
?>
最初にコンストラクタのstdClassのインスタンスを生成していた部分がPiece_
イベントハンドラには実際のデータアクセスコードが記述されています。Piece_
マッパー名はテーブル名に対応しており、
現在のところ、
最後の作業は、
- name: pieceblog
  dsn: pgsql://pieceblog:pieceblog@localhost/pieceblog
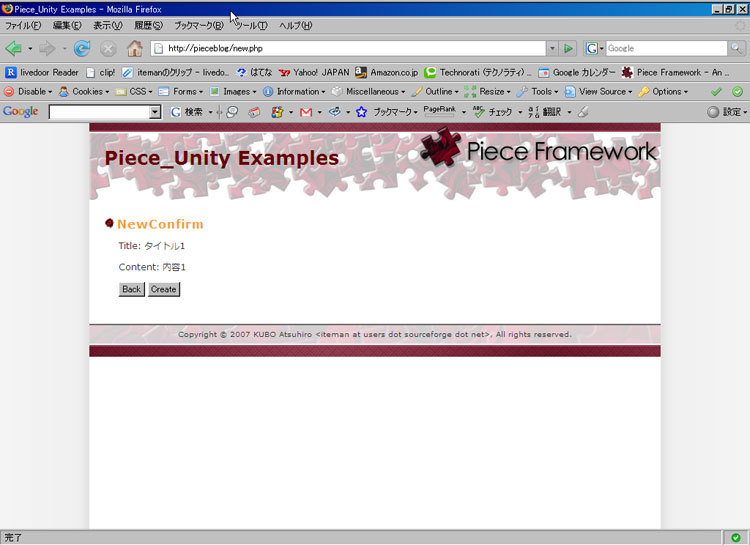
作業が完了したら、

$ select * from entry;
 id | title     | content
----+-----------+---------
  1 | タイトル1 | 内容1\r

(1 row)
おわりに
今回はデータベース設計とテーブル定義、
上記のようにPiece_
次回は残りの2つのフローにデータアクセスコードを組み込み、


