今回は、
既存クラスからテストを作成する
さて、
<?php
require_once 'Cart.php';

class Checkout {
    private $cart;

    public function __construct(Cart $cart) {
        $this->cart = $cart;
    }

    public function getSubTotal() {
        return $this->cart->getTotal();
    }

    public function getShippingCharge() {
        if ($this->cart->getTotal() > 1500) {
            return 0;
        } else {
            return 315;
        }
    }

    public function getTotal() {
        return $this->cart->getTotal() + $this->getShippingCharge();
    }

    public function getCart() {
        return $this->cart;
    }
}
しかし、
PHPUnit3には既存クラスから自動的にテストケースを生成するジェネレータが用意されています。今回はこれを使ってテストケースを作ってみましょう。
既存クラスからテストケースを生成するには、
$ phpunit --skeleton Checkout
PHPUnit 3.1.7 by Sebastian Bergmann.

Wrote test class skeleton for "Checkout" to "CheckoutTest.php".
$
生成されたCheckoutTest.
<?php
// Call CheckoutTest::main() if this source file is executed directly.
if (!defined('PHPUnit_MAIN_METHOD')) {
    define('PHPUnit_MAIN_METHOD', 'CheckoutTest::main');
}

require_once 'PHPUnit/Framework.php';

require_once 'Checkout.php';

/**
 * Test class for Checkout.
 * Generated by PHPUnit on 2007-08-23 at 15:27:59.
 */
class CheckoutTest extends PHPUnit_Framework_TestCase {
    /**
     * Runs the test methods of this class.
     *
     * @access public
     * @static
     */
    public static function main() {
        require_once 'PHPUnit/TextUI/TestRunner.php';

        $suite  = new PHPUnit_Framework_TestSuite('CheckoutTest');
        $result = PHPUnit_TextUI_TestRunner::run($suite);
    }

    /**
     * Sets up the fixture, for example, opens a network connection.
     * This method is called before a test is executed.
     *
     * @access protected
     */
    protected function setUp() {
    }

    /**
     * Tears down the fixture, for example, closes a network connection.
     * This method is called after a test is executed.
     *
     * @access protected
     */
    protected function tearDown() {
    }

    /**
     * @todo Implement testGetSubTotal().
     */
    public function testGetSubTotal() {
        // Remove the following lines when you implement this test.
        $this->markTestIncomplete(
          'This test has not been implemented yet.'
        );
    }

    /**
     * @todo Implement testGetShippingCharge().
     */
    public function testGetShippingCharge() {
        // Remove the following lines when you implement this test.
        $this->markTestIncomplete(
          'This test has not been implemented yet.'
        );
    }

    /**
     * @todo Implement testGetTotal().
     */
    public function testGetTotal() {
        // Remove the following lines when you implement this test.
        $this->markTestIncomplete(
          'This test has not been implemented yet.'
        );
    }

    /**
     * @todo Implement testGetCart().
     */
    public function testGetCart() {
        // Remove the following lines when you implement this test.
        $this->markTestIncomplete(
          'This test has not been implemented yet.'
        );
    }
}

// Call CheckoutTest::main() if this source file is executed directly.
if (PHPUnit_MAIN_METHOD == 'CheckoutTest::main') {
    CheckoutTest::main();
}
?>
生成されたCheckoutTest.
$ phpunit CheckoutTest
PHPUnit 3.1.7 by Sebastian Bergmann.

IIII

Time: 0 seconds


OK, but incomplete or skipped tests!
Tests: 4, Incomplete: 4.
$
それでは、
<?php
class Cart
{
                 :

    public function checkout() {
    }
}
また、
<?php
require_once 'PHPUnit/Framework.php';
require_once 'Cart.php';

class CartTest extends PHPUnit_Framework_TestCase
{
                :
    public function testCheckout() {
        $this->assertEquals('Checkout', get_class($this->cart->checkout()));
    }
}
それでは、
$ phpunit CartTest
 PHPUnit 3.1.7 by Sebastian Bergmann.

...........F

Time: 0 seconds

There was 1 failure:

1) testCheckout(CartTest)
Failed asserting that two strings are equal.
expected string <Checkout>
difference      <????????>
got string      <>
/home/shimooka/public_html/gihyo.jp/CartTest.php:177

FAILURES!
Tests: 12, Failures: 1.
$
それでは、
<?php
class Cart
{
                :
    public function checkout() {
        include_once 'Checkout.php';
        return new Checkout($this);
    }
}
それではテストを実行します。
$ phpunit CartTest
 PHPUnit 3.1.7 by Sebastian Bergmann.

............

Time: 0 seconds


OK (12 tests)
$
問題なさそうです。
それでは、
以下が、
<?php
                :

class CheckoutTest extends PHPUnit_Framework_TestCase {
                :
    public function testGetSubTotal() {
        $cart = $this->createEmptyCart();
        $checkout = new Checkout($cart);
        $this->assertEquals(0, $checkout->getSubTotal);

        $cart = $this->createCartTotal1500();
        $checkout = new Checkout($cart);
        $this->assertEquals(1500, $checkout->getSubTotal);

        $cart = $this->createCartTotal1501();
        $checkout = new Checkout($cart);
        $this->assertEquals(1501, $checkout->getSubTotal);
    }

    public function testGetShippingCharge() {
        $cart = $this->createEmptyCart();
        $checkout = new Checkout($cart);
        $this->assertEquals(315, $checkout->getShippingCharge);

        $cart = $this->createCartTotal1500();
        $checkout = new Checkout($cart);
        $this->assertEquals(315, $checkout->getShippingCharge);

        $cart = $this->createCartTotal1501();
        $checkout = new Checkout($cart);
        $this->assertEquals(0, $checkout->getShippingCharge);
    }

    public function testGetTotal() {
        $cart = $this->createEmptyCart();
        $checkout = new Checkout($cart);
        $this->assertEquals(315, $checkout->getTotal);

        $cart = $this->createCartTotal1500();
        $checkout = new Checkout($cart);
        $this->assertEquals(1815, $checkout->getTotal);

        $cart = $this->createCartTotal1501();
        $checkout = new Checkout($cart);
        $this->assertEquals(1501, $checkout->getTotal);
    }

    public function testGetCart() {
        $cart = $this->createEmptyCart();
        $checkout = new Checkout($cart);
        $this->assertTrue($cart === $checkout->getCart());

        $cart = $this->createCartTotal1500();
        $checkout = new Checkout($cart);
        $this->assertTrue($cart === $checkout->getCart());

        $cart = $this->createCartTotal1501();
        $checkout = new Checkout($cart);
        $this->assertTrue($cart === $checkout->getCart());
    }

    private function createEmptyCart() {
        include_once 'Cart.php';
        $cart = $this->getMock('Cart');
        $cart->expects($this->any())
             ->method('getTotal')
             ->will($this->returnValue(0));
        return $cart;
    }

    private function createCartTotal1500() {
        include_once 'Cart.php';
        $cart = $this->getMock('Cart');
        $cart->expects($this->any())
             ->method('getTotal')
             ->will($this->returnValue(1500));
        return $cart;
    }

    private function createCartTotal1501() {
        include_once 'Cart.php';
        $cart = $this->getMock('Cart');
        $cart->expects($this->any())
             ->method('getTotal')
             ->will($this->returnValue(1501));
        return $cart;
    }
                :
テストを実行してみます。
$ phpunit CheckoutTest
PHPUnit 3.1.7 by Sebastian Bergmann.

....

Time: 0 seconds


OK (4 tests)
$
こちらが想定したテストをすべてクリアしています。
複数のテストをまとめて実行する
ここまで2つのテストケースを作成し、
最も簡単なスイートのコードは、
<?php
require_once 'PHPUnit/Framework/TestSuite.php';

class AllTests
{
    public static function suite()
    {
        $suite = new PHPUnit_Framework_TestSuite();

        include_once 'CartTest.php';
        $suite->addTestSuite('CartTest');

        include_once 'CheckoutTest.php';
        $suite->addTestSuite('CheckoutTest');

        return $suite;
    }
}
ポイントは2つあります。
- PHPUnit_
Framework_ TestSuiteのインスタンスを返すpublic static suiteというメソッドを用意する - suiteメソッドの中で実行するテストを追加する
スイートの実行はテストケースの実行と同様、
$ phpunit AllTests.php
 PHPUnit 3.1.7 by Sebastian Bergmann.

................

Time: 0 seconds


OK (16 tests)
$
今まで作成した16個すべてのテストが一度に実行されていることが分かるでしょうか?
<?php
require_once 'PHPUnit/Framework/TestSuite.php';

class AnotherSuiteTests
{
    public static function suite()
    {
        $suite1 = new PHPUnit_Framework_TestSuite();
        include_once 'CartTest.php';
        $suite1->addTestSuite('CartTest');

        $suite2 = new PHPUnit_Framework_TestSuite();
        include_once 'CheckoutTest.php';
        $suite2->addTestSuite('CheckoutTest');

        $suite1->addTest($suite2);

        return $suite1;
    }
}
$ phpunit AllTests.php PHPUnit 3.1.7 by Sebastian Bergmann. ................ Time: 0 seconds OK (16 tests) $
phingとの連携
ここまでPHPUnit3の機能を色々と見てきましたが、
プロジェクトビルドシステムで有名なものとしては、
インストール
PhingはPEARパッケージとして提供されていますので、
$ sudo pear channel-discover pear.phing.info
$ sudo pear install -a phing/phing
インストール後、
$ which phing
/usr/local/lib/php5/bin/phing
$ phing -version
Phing version 2.3.0beta1
$ phing -help
phing [options] [target [target2 [target3] ...]]
Options:
  -h -help               print this message
  -l -list               list available targets in this project
  -v -version            print the version information and exit
  -q -quiet              be extra quiet
  -verbose               be extra verbose
  -debug                 print debugging information
  -logfile <file>        use given file for log
  -logger <classname>    the class which is to perform logging
  -f -buildfile <file>   use given buildfile
  -D<property>=<value>   use value for given property
  -find <file>           search for buildfile towards the root of the
                         filesystem and use it

Report bugs to <[email protected]>

$
build.xml
Phingは、
まずは、
<?xml version="1.0" encoding="utf-8"?>
<project name="Shopping Cart" basedir="." default="test">

  <target name="test">
    <phpunit2 haltonfailure="true" printsummary="true">
      <batchtest>
        <fileset dir=".">

          <include name="*Test.php"/>
        </fileset>
      </batchtest>
    </phpunit2>
  </target>

</project>
このbuild.
<project name="Shopping Cart" basedir="." default="test">project要素の子要素として定義しているのがtarget要素です。このtarget要素を使って、
  <target name="test">

         :
  </target>
また、
$ phing test
target要素の子要素には
  <target name="test">
    <phpunit2 haltonfailure="true" printsummary="true">

      <batchtest>
        <fileset dir=".">
        </fileset>
      </batchtest>

    </phpunit2>
  </target>
それぞれのタスクには子要素を指定できるものがあります。phpunit2タスクも、
なお、
さて、
$ phing
Buildfile: /home/shimooka/public_html/gihyo.jp/build.xml

Shopping Cart > test:

  [phpunit2] Tests run: 4, Failures: 0, Errors: 0, Time elapsed: 0.17452 sec
 [phpunit2] Tests run: 12, Failures: 0, Errors: 0, Time elapsed: 0.35853 sec

BUILD FINISHED

Total time: 2.1570 seconds
$
いかがでしょうか?
確かに、
また、
<?xml version="1.0" encoding="utf-8"?>

<project name="Shopping Cart" basedir="." default="test">
  <target name="test">
    <mkdir dir="reports/tests" />

    <phpunit2 haltonfailure="true" printsummary="true">
      <formatter todir="reports" type="xml"/>
      <batchtest>

        <fileset dir=".">
          <include name="*Test.php"/>
        </fileset>
      </batchtest>
    </phpunit2>

    <phpunitreport infile="reports/testsuites.xml" format="frames" todir="reports/tests" styledir="etc"/>
  </target>

</project>
formatterタグ・
このbuild.
$ phing
Buildfile: /home/shimooka/public_html/gihyo.jp/build.xml

Shopping Cart > test:

  [phpunit2] Tests run: 4, Failures: 0, Errors: 0, Time elapsed: 0.17598 sec
 [phpunit2] Tests run: 12, Failures: 0, Errors: 0, Time elapsed: 0.36254 sec

BUILD FINISHED

Total time: 2.2896 seconds

$ ls reports/tests/
allclasses-frame.html  index.html           overview-summary.html
default                overview-frame.html  stylesheet.css
$
実行結果は先のものと変わりませんが、

さらに、
<?xml version="1.0" encoding="utf-8"?>
<project name="Shopping Cart" basedir="." default="test">

  <target name="test">
    <delete dir="reports" includeemptydirs="true" verbose="true" failonerror="false" />

    <mkdir dir="reports/tests" />
    <mkdir dir="reports/coverage" />

    <coverage-setup database="reports/coverage.db">

      <fileset dir=".">
        <include name="*.php"/>
        <exclude name="*Test.php"/>
      </fileset>

    </coverage-setup>

    <phpunit2 haltonfailure="true" printsummary="true" codecoverage="true">
      <formatter todir="reports" type="xml"/>

      <batchtest>
        <fileset dir=".">
          <include name="*Test.php"/>
        </fileset>
      </batchtest>

    </phpunit2>

    <phpunitreport infile="reports/testsuites.xml" format="frames" todir="reports/tests" styledir="etc"/>

    <coverage-report>
      <report todir="reports/coverage" styledir="/usr/local/lib/php5/pear/data/phing/etc"/>
    </coverage-report>
  </target>

</project>
なお、
しかし、
<?php
                     :
    function run()
    {
                     :
            $coverageInformation = $res->getCodeCoverageInformation();

            if (PHPUnitUtil::$installedVersion == 3)
            {
// 以下の行をコメントアウトする
//                 CoverageMerger::merge($this->project, array($coverageInformation[0]['files']));
// 以下のforeach文を追加する
                foreach ($coverageInformation as $info)
                {
                    CoverageMerger::merge($this->project, array($info['files']));
                }
            }
            else
                     :
    }
修正したら、
$ phing
Buildfile: /home/shimooka/public_html/gihyo.jp/build.xml

Shopping Cart > test:

   [delete] Deleting /home/shimooka/public_html/gihyo.jp/reports/tests/overview-frame.html
   [delete] Deleting /home/shimooka/public_html/gihyo.jp/reports/tests/index.html
   [delete] Deleting /home/shimooka/public_html/gihyo.jp/reports/tests/allclasses-frame.html
   [delete] Deleting /home/shimooka/public_html/gihyo.jp/reports/tests/default/package-summary.html
   [delete] Deleting /home/shimooka/public_html/gihyo.jp/reports/tests/default/CheckoutTest.html
   [delete] Deleting /home/shimooka/public_html/gihyo.jp/reports/tests/default/package-frame.html
   [delete] Deleting /home/shimooka/public_html/gihyo.jp/reports/tests/default/CartTest.html
   [delete] Deleting directory /home/shimooka/public_html/gihyo.jp/reports/tests/default
   [delete] Deleting /home/shimooka/public_html/gihyo.jp/reports/tests/overview-summary.html
   [delete] Deleting /home/shimooka/public_html/gihyo.jp/reports/tests/stylesheet.css
   [delete] Deleting directory /home/shimooka/public_html/gihyo.jp/reports/tests
   [delete] Deleting /home/shimooka/public_html/gihyo.jp/reports/testsuites.xml
   [delete] Deleting directory /home/shimooka/public_html/gihyo.jp/reports
    [mkdir] Created dir: /home/shimooka/public_html/gihyo.jp/reports/tests
    [mkdir] Created dir: /home/shimooka/public_html/gihyo.jp/reports/coverage
[coverage-setup] Setting up coverage database for 3 files
   [phpunit] Tests run: 4, Failures: 0, Errors: 0, Time elapsed: 2.04162 sec
  [phpunit] Tests run: 12, Failures: 0, Errors: 0, Time elapsed: 6.63770 sec
[coverage-report] Transforming coverage report

BUILD FINISHED

Total time: 11.8971 seconds

$ ls reports/coverage/
allclasses-frame.html  index.html           overview-summary.html
default                overview-frame.html  stylesheet.css
$
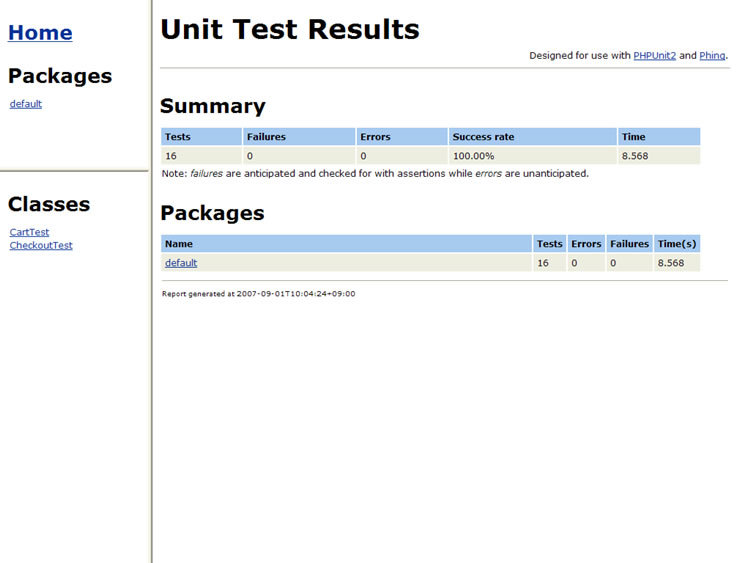
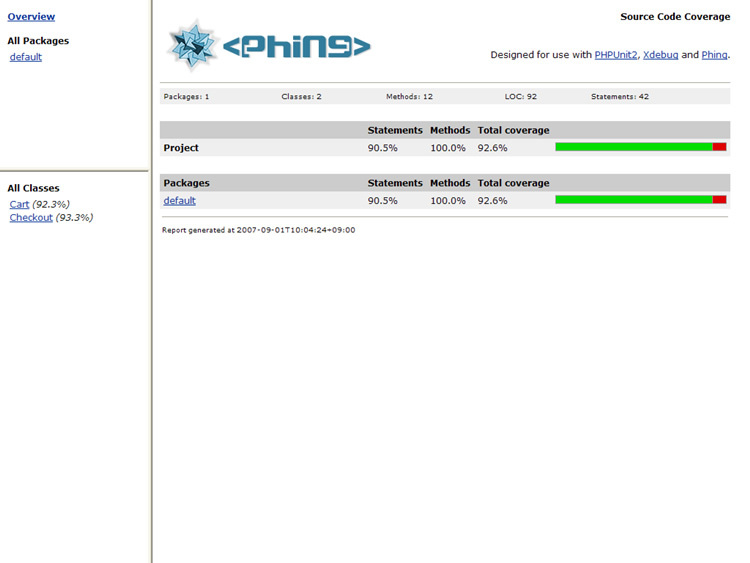
実行後、

なお、
Phingには紹介したタスク以外に、


