今回は、
HHVMとは
HHVM
先日、
Ubuntu用にHHVMのパッケージを提供するリポジトリがhhvm.
コンテナの準備
今回はテスト環境にLXCを使います。詳細は本連載の第226回を参考にしてください。
まずLXCパッケージをインストールします。
$ sudo apt-get update
$ sudo apt-get install lxc
次にコンテナを作成します。名前はsaucyとします。環境変数MIRRORで日本のミラーサイトを使うように指定します。
$ sudo MIRROR=http://ubuntutym.u-toyama.ac.jp/ubuntu/ lxc-create -t ubuntu -n saucy
Checking cache download in /var/cache/lxc/saucy/rootfs-amd64 ...
installing packages: vim,ssh,language-pack-en,language-pack-ja
Downloading ubuntu saucy minimal ...
W: Target architecture is the same as host architecture; disabling QEMU support
I: Running command: debootstrap --arch amd64 --verbose --components=main,universe --include=vim,ssh,language-pack-en,language-pack-ja trusty /var/cache/lxc/trusty/partial-amd64 http://ubuntutym.u-toyama.ac.jp/ubuntu/
I: Retrieving Release
I: Retrieving Release.gpg
I: Checking Release signature
...
##
# The default user is 'ubuntu' with password 'ubuntu'!
# Use the 'sudo' command to run tasks as root in the container.
##
これで、
$ sudo lxc-start --name=saucy
...
Ubuntu 13.10 saucy console

saucy login:
HHVMパッケージのインストール
コンテナにログインしてHHVMパッケージをインストールする作業を行います。まずwgetパッケージをインストールします。
$ sudo apt-get install wget
次にリポジトリのGPG鍵をインポートします。
$ wget -O - http://dl.hhvm.com/conf/hhvm.gpg.key | sudo apt-key add -
リポジトリをパッケージ管理システムに追加します。
$ echo deb http://dl.hhvm.com/ubuntu saucy main | sudo tee /etc/apt/sources.list.d/hhvm.list
最後にhhvmパッケージをインストールします。
$ sudo apt-get update
$ sudo apt-get install hhvm
...
アップグレード: 0 個、新規インストール: 88 個、削除: 0 個、保留: 0 個。
48.1 MB のアーカイブを取得する必要があります。
この操作後に追加で 117 MB のディスク容量が消費されます。
続行しますか [Y/n]?
...
hhvm (3.0.0~saucy) を設定しています ...
update-alternatives: /usr/bin/php (php) を提供するために 自動モード で /usr/bin/hhvm を使います
********************************************************************
* HHVM is installed. Here are some more things you might want to do:
*
* Configure your webserver to use HHVM:
* $ sudo /usr/share/hhvm/install_fastcgi.sh
* $ sudo /etc/init.d/nginx restart
* $ sudo /etc/init.d/apache restart
* $ sudo /etc/init.d/hhvm restart
*
* Run command line scripts with HHVM:
* $ hhvm whatever.php
*
* Use HHVM for /usr/bin/php even if you have php-cli installed:
* $ sudo /usr/bin/update-alternatives --install /usr/bin/php php /usr/bin/hhvm 60
********************************************************************
...
さて、
$ hhvm --version
HipHop VM 3.0.0 (rel)
Compiler: tags/HHVM-3.0.0-0-g59a8db46e4ebf5cfd205fadc12e27a9903fb7aae
Repo schema: 48906efe08d29a403bbe13414f32ccd256708e0b
hhvmはphpのalternativeとして登録されています。そのため、
$ php --version
HipHop VM 3.0.0 (rel)
Compiler: tags/HHVM-3.0.0-0-g59a8db46e4ebf5cfd205fadc12e27a9903fb7aae
Repo schema: 48906efe08d29a403bbe13414f32ccd256708e0b
PHPのコードを実行してみます。
$ echo '<?php echo "hello hhvm\n";' > /tmp/hello.php
$ hhvm /tmp/hello.php
hello hhvm
PHP
HTTPサーバーの準備
HTTPサーバーをインストールして、
まず、
$ sudo apt-get install avahi-daemon
hhvmは今のところ、
$ sudo apt-get install apache2
hhvmをインストールしたときの出力を参考に、
$ sudo /usr/share/hhvm/install_fastcgi.sh
最後に、
$ sudo service hhvm restart
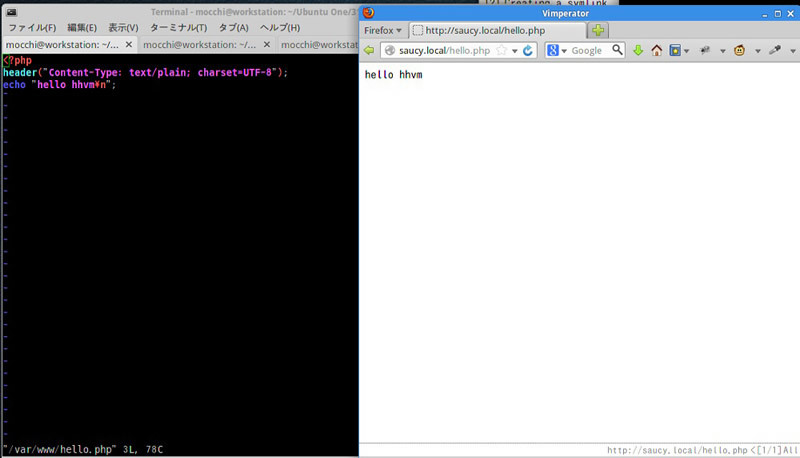
これでHTTPサーバーの準備完了です。ドキュメントルートに以下のPHPスクリプトを置きます。
<?php
header("Content-Type: text/plain; charset=UTF-8");
echo "hello hhvm\n";
ホストでWebブラウザを起動し、

Hack言語の使用
Hack言語はPHPとシームレスに相互運用可能な言語として開発されました。そのため、
Hack Language ReferenceのType AnnotationsからAnnotating Arraysのサンプルを試します。今回のレシピの目的は試すことにあるので言語の詳細については割愛します。
<?hh

class FooFoo {}
class HackArrayAnnotations {
  private array<FooFoo> $arr;
  private array<string, FooFoo> $arr2;

  public function __construct() {
    $this->arr = array();
    $this->arr2 = array();
  }

  public function bar<T>(T $val): array<T> {
    return array($val);
  }

  public function sort(array<int, float> $a): array<int, float> {
    sort($a);
    return $a;
  }

  public function baz(FooFoo $val): array<FooFoo> {
    $this->arr[] = $val;
    return $this->arr;
  }
}

function main_aa() {
  $haa = new HackArrayAnnotations();
  var_dump($haa->bar(3));
  var_dump($haa->bar(new FooFoo()));
  var_dump($haa->sort(array(1.3, 5.6, 2.3, 0.2, 1.4)));
  var_dump($haa->baz(new FooFoo()));
}

main_aa();
以上を適当なファイルに保存して、
$ hhvm /tmp/array.hh
array(1) {
  [0]=>
  int(3)
}
array(1) {
  [0]=>
  object(FooFoo)#2 (0) {
  }
}
array(5) {
  [0]=>
  float(0.2)
  [1]=>
  float(1.3)
  [2]=>
  float(1.4)
  [3]=>
  float(2.3)
  [4]=>
  float(5.6)
}
array(1) {
  [0]=>
  object(FooFoo)#2 (0) {
  }
}
コンテナの終了と削除
コンテナを終了するには別な端末を開き、
$ sudo lxc-stop --name=saucy
コンテナを削除するには以下のコマンドを実行します。
$ sudo lxc-destroy --name=saucy


