ArkoseはLXCを用いたサンドボックス環境を簡単に作成できるツールです。Arkoseを使うと、
そこで今回は、
Arkoseとは
Arkoseは、
Ubuntuには数多くのデスクトップアプリケーションが存在し、
幸いDebian/
Arkoseを使うと、
同様のことはVirtualBoxやKVMといった仮想マシンを使うことでも実現可能ではあるものの、
ただし、
ArkoseはあくまでUbuntu上でアプリケーションをテストするためのツールだと思っておいた方が良いでしょう。
ちなみに、
Arkoseを使ったアプリケーションの起動
まずはArkoseをインストールします。
$ sudo apt-get update
$ sudo apt-get install arkose arkose-gui
arkose-guiは、
GUIアプリケーションを動作させるためには、
実際に端末からArkose越しにGeditを起動してみましょう。
$ sudo arkose -n -c gedit
"-n"オプションはサンドボックスからネットワークを使用することを示すフラグです。GUIアプリケーションの場合は、

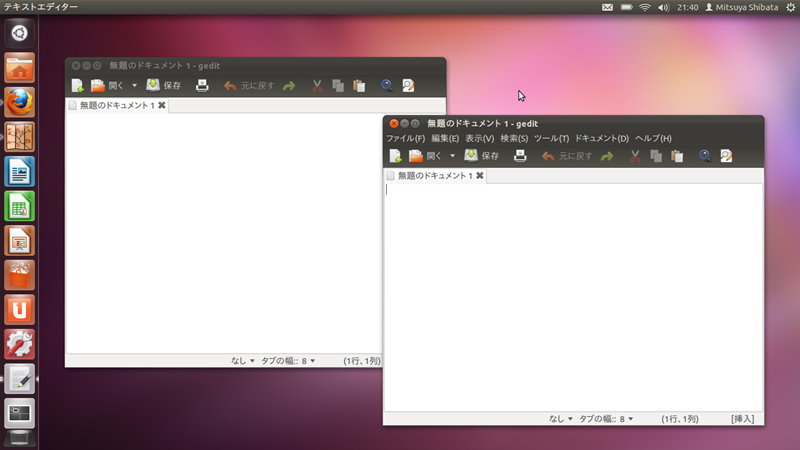
図1では普通に起動したGeditとArkoseで起動したGeditを並べてみました。見た目にはメニュー意外ほとんど違いはありませんが、
仮想環境のイメージや設定ファイル、
Arkoseのプロファイル
特定のディレクトリはCOWで、
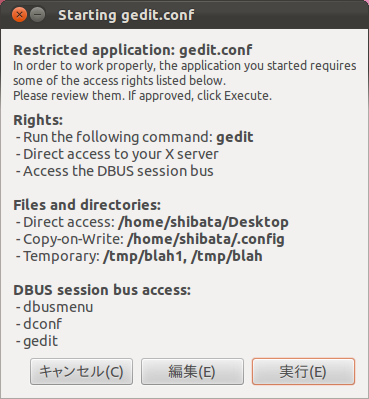
すでにいくつかのプロファイルサンプルが/usr/
$ sudo arkose-wrapper-gui /usr/share/arkose/wrapper-profiles/gedit.conf

確認画面はその場で一時的に編集可能です。各設定項目の内容はソースコードなどを参考にしてください。
fstype: ext4 or tmpfs
fssize: size in MB. Defaults to 2GB for ext4 and 50% of available RAM for tmpfs
network: Network access: "none", "direct" or "filtered"
xserver: What kind of X access should be allowed: none, isolated, direct
dbus: DBUS access: "none", "system", "session" or "both"
dbusproxy: Configuration for DBUS proxy, these will be added line by line to the actual config
pulseaudio: Enable pulseaudio access in the container
devices: Allow the given devices in the container
ctype: Container type, either cow (copy on write) or bind (full bind-mount of the FS)
bind: List of paths to bind-mount in the container
restrict: List of paths to empty in the container (bind-mounts an empty directory)
cow: List of paths to mount as copy-on-write
gedit.
シェル環境をArkoseで起動する
以下のようにArkoseでシェルを起動すれば、
$ sudo arkose -n -c "cd $PWD; $SHELL"
この環境であれば、
shibata@arkose-tmpdFHjGE:~$ apt-cache policy hello
hello:
  インストールされているバージョン: (なし)

# ホストにインストールされていないhelloをインストールする
shibata@arkose-tmpdFHjGE:~$ sudo apt-get install hello
shibata@arkose-tmpdFHjGE:~$ apt-cache policy hello
hello:
  インストールされているバージョン: 2.7-1

# キャッシュにもインストールしたパッケージファイルが残っている
shibata@arkose-tmpdFHjGE:~$ ls /var/cache/apt/archives/hello*
/var/cache/apt/archives/hello_2.7-1_amd64.deb
shibata@arkose-tmpdFHjGE:~$ exit

# 実験環境からホストに戻ると、インストールが「なかったこと」にされていることがわかる
$ apt-cache policy hello
hello:
  インストールされているバージョン: (なし)

# キャッシュにも存在しない
$ ls /var/cache/apt/archives/hello*
ls: /var/cache/apt/archives/hello* にアクセスできません: そのようなファイルやディレクトリはありません
まとめ
このように、
現在開発中のPresiceでは、


